
Registration & Verification
Why Binance Verification Fails and What to Check Next
A structured checklist for diagnosing Binance identity verification problems without guessing, altering documents or bypassing regional rules.
A failed Binance identity verification is frustrating precisely because the rejection message is often generic: "verification failed, please try again." But behind that message there is almost always one of a small number of concrete causes — and each has a specific fix. This guide works through them in the order that resolves the most cases, so you can correct the real problem instead of blindly resubmitting the same documents.
One principle before we start: never try to "beat" verification with edited images, borrowed documents or a VPN. Even when those tricks pass the automated check, they surface later during withdrawals or compliance reviews, at which point the account — and anything in it — can be restricted. Verification is the foundation of the account; it has to be genuine.
Start with the exact error
Read the rejection notice carefully, in the app rather than in email (phishing emails imitate KYC failures to harvest documents). The wording narrows the cause considerably:
- "Document not supported" points to an eligibility or document-type problem.
- "Information does not match" points to a data-entry inconsistency.
- "Image unclear / could not read document" points to photo quality.
- "Face verification failed" points to the liveness step.
- A silent, repeated failure with no clear reason often means an eligibility, region or duplicate-account issue that the automated flow will not spell out.
Match your situation to the sections below.
Check your eligibility and document type
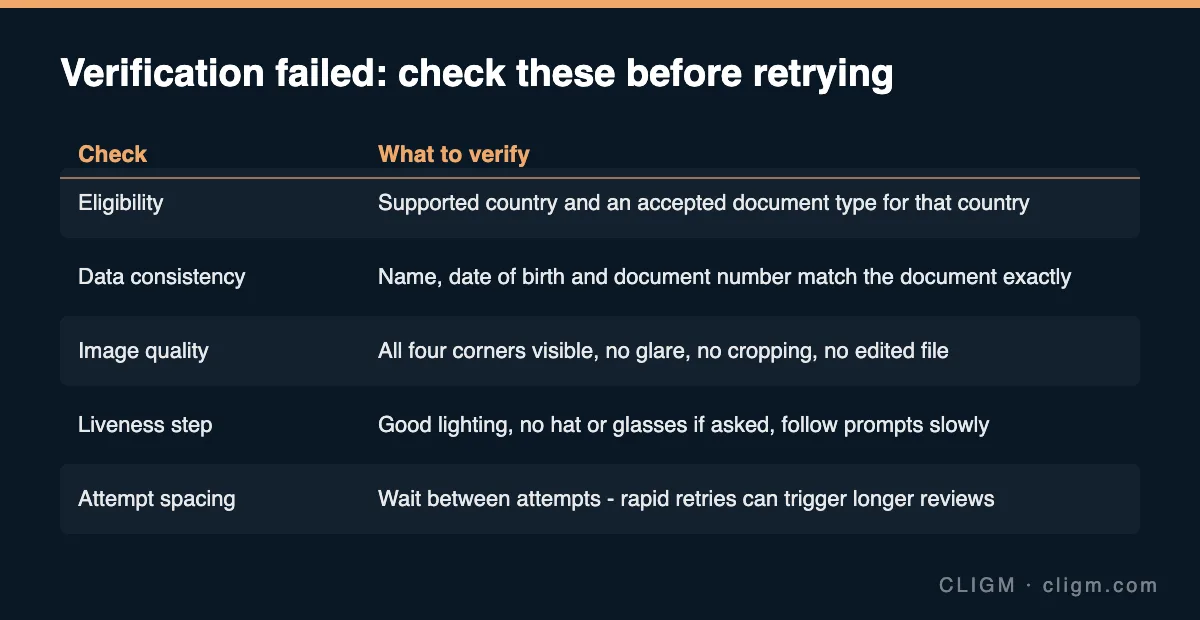
Before anything else, confirm three things. First, that Binance operates in your country of residence — availability changes with regulation, and a region that worked last year may be restricted now. Second, that the document you submitted is on the accepted list for your country; some countries accept passports only, others accept national ID cards and driving licences too. Third, that the document is valid: not expired, not a photocopy, not a temporary paper version.
If you have ever created another account with the same identity — even years ago, even one you forgot — verification on a new account can fail because identity documents can generally only back one account at a time. In that case, recover the original account instead of fighting the new one.
Age matters too: you must meet the minimum age requirement, and a document that cannot prove date of birth will not pass.
Make every field consistent
The automated check compares what you typed against what it reads from the document. Any mismatch can fail the attempt:
- Enter your name exactly as printed, including middle names, in the same order.
- If your document is in a non-Latin script and shows an official transliteration, use that transliteration — not your preferred English spelling.
- Check the date of birth format carefully; day/month reversal is a classic silent failure.
- The document number must match precisely, including letters and leading zeros.
- Your selected country must match the issuing country of the document.
If you legally changed your name and your documents disagree with each other, verify with the document you submitted and expect to provide supporting paperwork through support later.
Improve the document image
Automated document readers are strict about image quality. Retake the photo with these rules:
- All four corners of the document visible; nothing cropped.
- Flat, straight-on angle — not tilted, not held in your hand at a slope.
- Bright, even light without flash glare on the laminate. Daylight near a window works better than ceiling lights.
- No filters, no editing, no screenshots of existing photos, no scans. The system detects processed images and treats them as tampering risks.
- File taken live in the app where possible, rather than uploaded from the gallery.
If your document has a holographic overlay that catches light, angle the light source sideways until the text is readable without glare.
Pass the liveness check
The face-verification step compares you to the document photo and checks that you are a live person. Do it yourself — it cannot be delegated. Use good frontal lighting, remove hats and heavily tinted glasses, hold the phone at eye level, and follow the movement prompts slowly and completely. If your appearance has changed dramatically since the document photo (major weight change, facial surgery), repeated failures may require a support ticket with additional evidence.
Avoid repeated rapid attempts
Each failed attempt in quick succession can push your case from the fast automated lane into a slower manual-review queue, and too many attempts can lock verification for a cooling-off period. After a failure: identify the cause using the sections above, fix it properly, wait at least a little while, then submit one careful attempt. One corrected submission beats five hasty ones.
When to contact official support
Open a support ticket when the same corrected submission fails twice, when the rejection reason is missing or clearly wrong, or when you suspect a duplicate-identity conflict. Contact support only through the official app or website — never through numbers or handles that contact you first. Prepare a short factual summary: document type, issuing country, exact error text, dates of attempts. Do not send document photos to anyone outside the official support flow; a real agent works inside the ticket system, not over Telegram.
While the case is open, resist the temptation to create a fresh account with the same identity — it usually makes both cases slower.
What not to do
For emphasis, because each of these creates a worse problem than the one it solves:
- Do not use another person's documents, or lend yours to anyone.
- Do not buy "verified accounts." You would not control the recovery email, and the seller can reclaim the account after you fund it.
- Do not use photo-editing tools to "fix" a document image.
- Do not spoof your location with a VPN to access a restricted region. Withdrawal-time compliance checks are stricter than signup checks.
If Binance genuinely is not available where you live, the constructive path is a licensed exchange that does operate in your country — not identity workarounds.
Once verification passes
The moment KYC clears, finish the job: secure the account before funding it. Our 15-minute security checklist covers 2FA, the anti-phishing code and device review. And if you are starting from zero, the full sequence from registration to first transfer is in how to create a Binance account safely.
CLIGM is an independent publication, not affiliated with Binance. We cannot see or influence individual verification cases; specifics vary by country and change over time — the in-app flow is always the authority. Last reviewed: July 27, 2026.